5 Exercises Your Tight Hips Really Want
Guest post by Artem.
People attribute a lot of pain to their tight hips.
Even though that’s true (tight hips rotate the pelvis into anterior tilt - which leads to back pain), hips get tight for a reason.
In fact, a common reason is that your body is trying to stabilize your spine, and “tightness” is a way it achieves the goal.
Given that, it’s entirely possible to release tight hips without actually doing any hip flexor stretches.
And today I show exactly how you can release your hips with these 5 exercises.
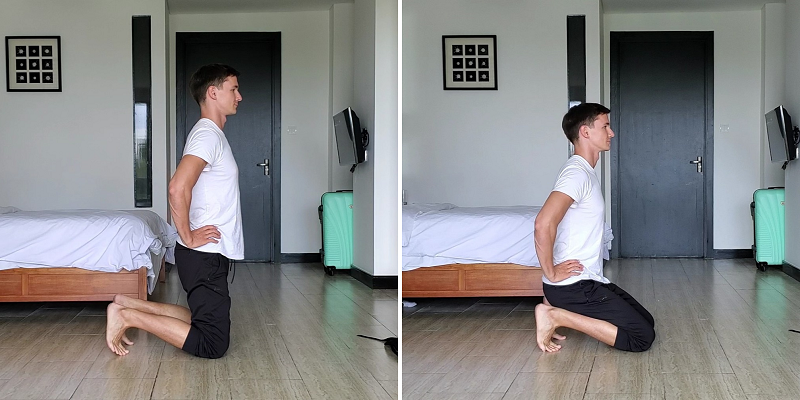
Exercise 1: Big Toe Sit Active Stretch
During my research into rehabilitation, I was surprised to learn that A LOT actually starts with our big toes!
Modern shoes limit the amount of work our feet are free to do and in many cases, big toes end up being really inflexible.
This affects the walking pattern and, believe it or not, hip mobility!
So for this exercise, I want you to mobilize your feet and stretch your big toes as much as you can but...please no injuries!
To do the exercise:
- Sit on the floor (you can use a mat) with your feet and toes places like on the photo
- Start the movement by gradually descending into a fully seated position while maintaining your posture and toe placement (they will be quite under some stretch)
- Once your heels touch your butt, start getting back up into the starting position
- I recommend starting with 3 repetitions and gradually progress to 12
Things to watch:
- Your toes might be under tension at the start - there is no need to push through! If you can’t sit, it’s OK to stop half-way and return back up
- This exercise requires consistency - so don’t expect any quick results
Exercise 2: Glute Bridges

Gluteus maximus is a large set of muscles that are typically highly underactive in the general western population.
It happens because people don’t need to go all the way down while squatting (as there are chairs).
Underactive glutes lead to all sorts of problems including back pain and forward head posture (here are some exercises to fix forward head posture by the way).
So in order to get those glutes safely active again, I recommend glute bridges.
To do the exercise:
- Lie down on the floor with your knees bent
- Now push your bum away from the floor bringing your pelvis forward
- Gradually bring it back on the floor and repeat the exercise - I recommend doing 20 repetitions in 1 set to activate these muscles
Things to watch:
- Push your pelvis forward as much as you can - that means, you need to squeeze those butt cheeks as much as possible!
Exercise 3: Adductor Activation

The conventional wisdom frequently pushes working on hip abductors (muscles that elevate your legs sideways) whereas very little attention is ever given to adductors!
The thing is...adductors tend to be tight and weak no less than abductors.
This is why it’s important to activate them first.
I like this isometric exercise that literally turns it all on.
To do the exercise:
- Start in the position that is similar to the side plank
- Instead of using both legs, you would only use one leg (that’s your “top” leg) which you would push into the floor while another leg is going to be in the air (see the photo of me struggling)
- Try to hold this pose for 3 seconds per leg and gradually progress to 30 seconds per side
Things to watch for:
- It can be hard to start with the leg completely straight so you can either bend it or place the 2nd leg on the floor while still mostly leaning on your “top” leg
- Keep your body straight and don’t forget to breathe!
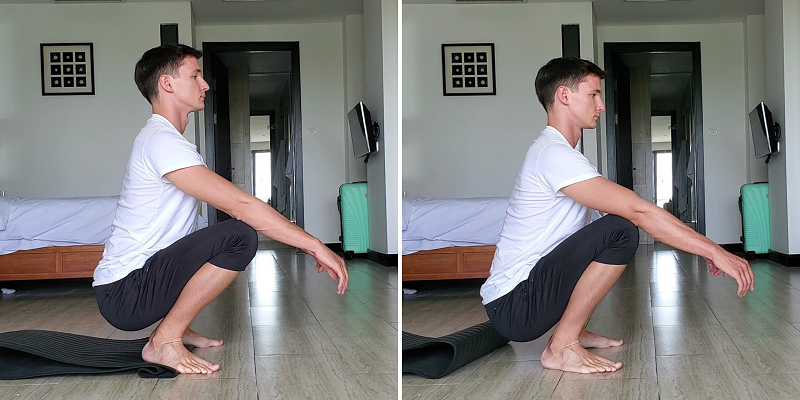
Exercise 4: Squat
One thing that I learned from the master of movement, Ido Portal, is that hips require...intensity!
In other words, you really want to load up your hip joints with different movement patterns.
Full squats are exactly that because they allow your hip joints to work in all those degrees of motion they were initially designed to operate in.
At times there was a popular squat challenge - 30x30.
It means you spend 30 minutes per day in a squat position for 30 days straight.
The idea is that you would accumulate those minutes throughout the day (e.g. 3 minutes per set 10 times a day) and do that for 1 month because seeing any notable changes in something as tight as a hip joint takes a substantial amount of stimuli for a notable duration of time.
If squatting is challenging for you, start with placing something like a book (or just a yoga mat) underneath your heels so that they are slightly elevated from the ground - that will make it a lot easier.
As you progress, reduce the thickness of that book (you can just flip those pages) so that your heels would be getting closer to the ground.
Exercise 5: Peeing Dog

Yes, I’m aware - that’s just the name of the exercise!
Peeing dog is a great exercise for hip abductors (especially glute medius muscles) which tends to be dormant (and even weaker) in the female population.
Peeing dog is not only a great exercise for your hip abductors...it’s also wonderful for obliques and spine stabilizers since you would need to withstand the contralateral torque that arises from hip elevation.
To do this exercise:
- Assume a quadruped position on the floor with all fours on the ground (hands and knees).
- Make sure your hips and knees are at 90-degree angles - this is the most comfortable position.
- Maintain that position while elevating your left leg by using your hip.
- Bring it as high as you can without trying to compensate by using other parts of your body - the trick is to get the leg up by only using your hip!
- Slowly bring the leg back into starting position and repeat the exercise
- I recommend starting with 3 quality (!) repetitions and gradually building it up to 12 repetitions per set for each leg.
Things to watch:
- Make sure you are not compensating by moving your body, flexing your arms, or rotating the pelvis.
- Elevate the leg up gradually without trying to use the momentum to get it higher - that’s not the point of the exercise
Final Words
Hips love to work and so it’s important to USE them.
Start safely and maintain the freedom that you have because...you can!


